![]()
Promoting the Bagpipe Revival since 1986
The Bagpipe Society
The Musette à ravalment, restoration and reconstruction
Not your average musette
slightly bemused dog
The musette holds a special place in the wonderful world of bagpipes, as the once favourite instrument of the French aristocrats in the 17th and 18th century. In the second half of the 18th century, people gradually lost interest until the musette went completely out of fashion. Of course, the 1789 revolution helped a bit, too. After nearly 200 years of silence, pioneers like Shelly Grushkin, Michael Muskett, JC Maillard and Remy Dubois brought the instrument slowly back to life. Luckily, quite a few historic musettes survived this long period of neglect. In this article, we will take a closer look at the restoration process of an uncommon type of musette, called a musette à ravalement.
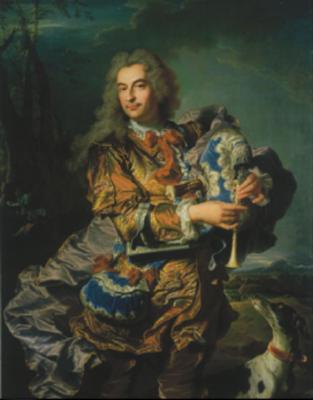
This specific type of musette has an extra-long main chanter or grand chalumeau, with three extra keys to extend the range downwards. The picture of Gaspard de Gueidan by Hyacinthe Rigaud (1735) is probably the most famous example of a musette à ravalement.
There are three of these musettes displayed in museums, one in The Metropolitan in New York (1982.100.4), and two in the Musée de la Musique in Paris (E.21.63 and D.AD.34674). The one in New York has been seriously damaged by a former owner; the tone holes are a lot larger than they should be, and someone thought it would be a good idea to saw 10-15mm of the top. Probably to raise the pitch so it could be used as a more traditional bagpipe. A lot of other historic musettes have suffered the same fate, as most instruments were tuned to a lower pitch in the baroque period. Unfortunately, historically informed performance practice wasn’t really a thing until the mid 20th century.
The E.12.63 instrument in Paris has a nasty crack at the top of the chanter, and the other one was shortened just above the bell, perhaps to cover up a crack as well. So unfortunately, none of these are in working order and accessibility for makers is limited. A few years ago, there was talk of repairing one of them, but those plans were discarded by the museum.
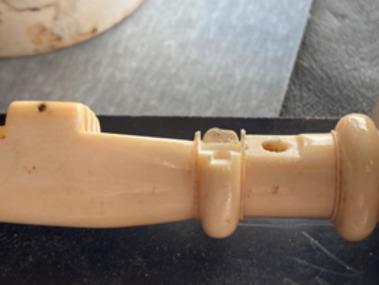
In 2017, a fourth musette à ravalement showed up for sale, at an auction in Vichy. It was badly damaged and incomplete, only a part of the grand chalumeau survived. All of the keys and the bell were missing, the bore had been enlarged and 4 key blocks were ripped off. Perhaps by someone who wanted to melt down the silver keys.
I was ‘lucky’ enough to be able to buy this broken piece of ivory, with the intention of bringing it back to life.
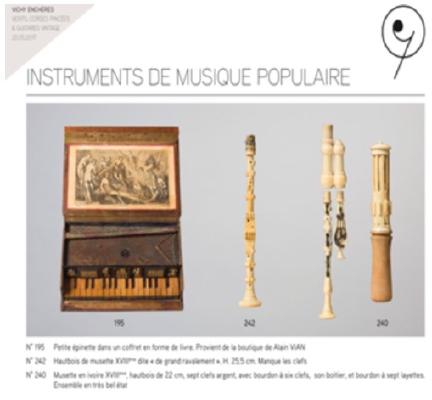
Picture by Vicky Enchères auction house.
You can download plans of all four of these musettes from our website musettesociety.com, in case you are interested in making your own copy.
Repairing the damage
In 2021 I got a grant from the Flemish government to restore this instrument and document the process for future reference. After careful planning and talking to my master, Remy Dubois, about the least intrusive approach, we started working on it in August 2021.
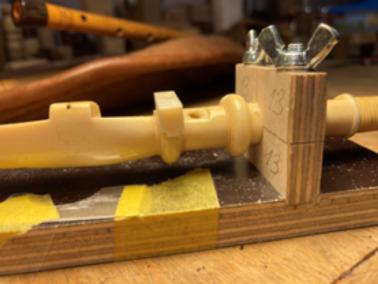
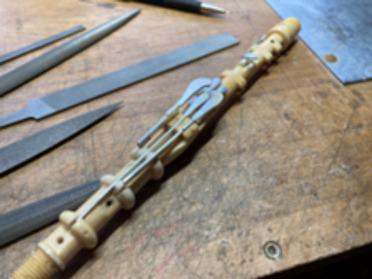
Unfortunately, the four damaged key blocks could not be saved. To make a functional instrument you need a solid base to start from. We decided to remove the broken parts completely using a flute mill and dovetail mill, and then inserted a new piece of pre-convention ivory. The dovetail joint makes a sturdy connection with the old instrument. Where the ivory is very thin, I inserted a 0.9mm ivory rod as reinforcement. A bit of thin superglue holds everything in place. After careful filing, turning and sanding, I milled the grooves for the keys, and drilled the holes for the axles.
At this stage, all work on the outside was done so I could turn my attention to the bore. According to the other surviving musettes à ravalement, the bore is drilled in a few steps. The largest section has a 3.8mm bore, from the top to the upper ring at the bottom. This is roughly the length of a standard musette. The part with the three extra rings has a slightly larger bore, going from 3.8 to approximately 4.2mm, and then you have the (missing) bell. By enlarging the bore here, you can tune the lower notes. A wider bore raises the pitch.
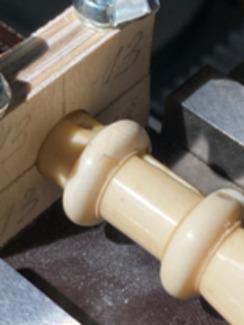
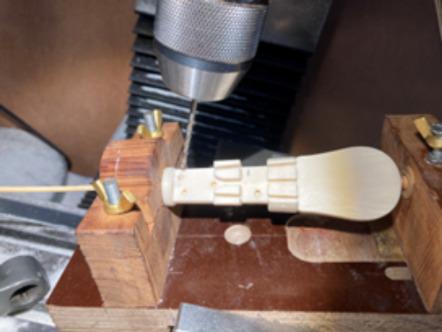
finishing it on the lathe
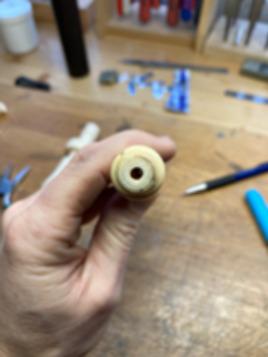
On this instrument, someone had enlarged a section of the bore to a 6mm diameter. I turned a new piece of ivory with a 3.3mm pilot hole, and glued it in the chanter. The next day I drilled again with a 3.8mm gun drill and reamed with a conical reamer made from a steel rod.
In with the new

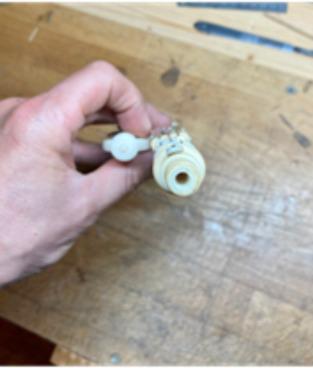
With what remained of the original chanter now restored, I could start with making the missing parts to complete the instrument. The bell and main stock (boîtier du grand chalumeau) are screwed onto the old chalumeau. For this, we ordered an exact copy in metal of the existing screw threads, which I then milled to use as a tap to make the internal screw thread on the new parts.
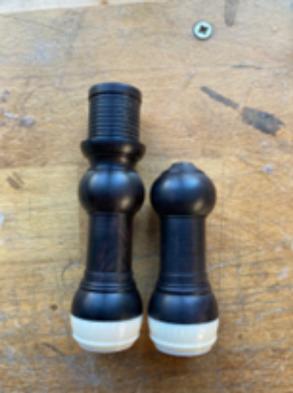
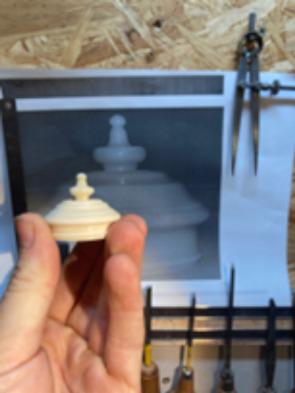
The dimensions of the bell are based on the French instrument D.AD.34674. I made a few attempts in wood, adjusting the total length and bore, until the lowest note (c’) was slightly flat. This way I was certain I could get it to play in tune by removing a little bit of material later. Once I was happy with the dimensions of my wooden bell, I made one in ivory, with the screw thread.
The inside has a 17mm long conical bore, starting at a 4.3mm diameter and at the end it’s ⌀7mm. This cone has a double function, it allows you to tune the c’, and makes the transition to the actual bell, which is more of an oval, 16mm wide at the end. The bell changes the overall tone and projection of the instru- ment. Without it, the sound is a little softer and a bit bland.
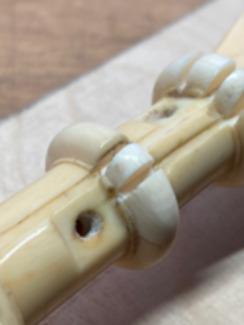
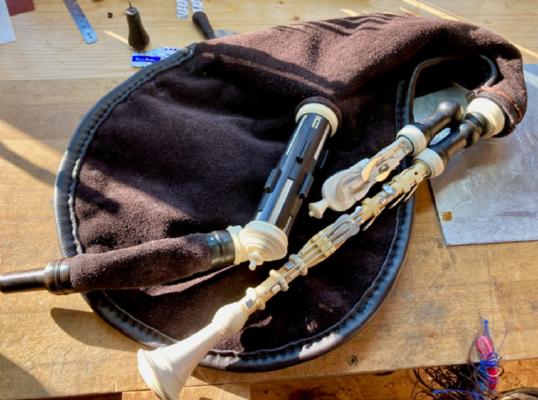
For the other parts, it was just like making a new musette. Instead of making a complete instrument out of ivory, like they usually did in the 18th century, I tried to use as little ivory as possible. For the drone, stocks and portevent (connection between bag and bellows) I used FSC African Blackwood from Tanzania (supplied by Sound And Fair) I then added a few ornamental ivory rings, all made from pre-cconvention ivory, with the necessary paperwork. The design is based on the signed Chédeville musette in the MIM in Brussels. Instead of the more traditional 6 key petit chalumeau, I chose for an 8 key model. This allows the musician to play a high e flat and e, combine the keys and you hear an f.
With the extended range downwards and upwards, this musette has a total of 18 keys, whereas a standard musette only has 12. The 6th ‘special’ key is a high a flat on the grand chalumeau. Only a handful of historic musettes have this key, it took a few tries before I got it right.
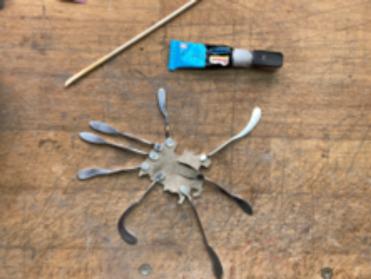
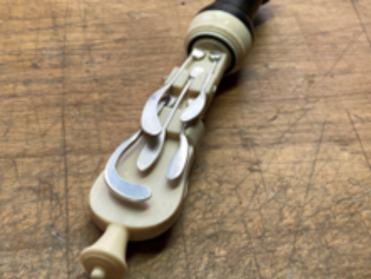
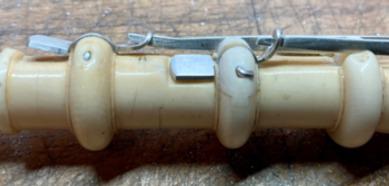
Most of the other keys are standard stuff (for a musette builder at least), but the extra keys at the bottom are something else. I carefully studied the pictures Francis Wood sent me of the instrument in New York, and tried to copy them. The original keys are cast, but since I don’t know how to do that, I just made them by hand from a sheet of 1.3mm silver. It involved a bit of trial and error, but I got there in the end. These are double action keys, consisting of two parts. A long part that acts as a lever, and a small part to cover the tone hole. The connection is made through a hole at the end of the smallest part. Pushing the lever down closes the tone hole, which is uncovered when the key is not in use.
If you want to play the lower notes, you have to close the keys you need, in the right order. From the player’s perspective, looking at the back of the instrument, closing all the keyless holes and the left ‘ravalement’ key gives you an e’, combined with the right key, a d’, and all three of them a c’. The highest note on the petit chalumeau is an f’’’, an impressive range for a woodwind instrument from that period.
After polishing, hardening and mounting the keys, there were only two things left to do: assembling the instrument, and making reeds. Both chanters have their own reeds, and each drone has its own reed as well. The drone I made for this instrument needs four reeds. A dessus (g’), haute contre (c’ or d’), taille (g) and basse (G or c) which you can use all at once, or in any combination you like.
So, 6 reeds, all double reeds, to make and balance, and fine-tune the in- strument. This usually takes a few weeks because reeds need to take their final shape and ‘rest’ a little. The more time I allow at this stage, the more stable the instrument will be later. I posted a video on Facebook of me attempting to improvise a tune, with reeds that were only one day old. If you ever made your own reeds, you know what a great idea this was. Combine that with a bunch of keys I never made nor used before and I completely understand if you don’t go running off to your computer to check it out.
Less is more? Nah.
in the background
Those of you familiar with the musette might ask themselves, why try and make an already complicated instrument even more complex? I feel there are many possible reasons. The easiest explanation would be vanity. As the musette was not only a usable instrument but also a way to display wealth, one can imagine ‘having the longest musette’ might have been a selling point. Also, the baroque era was a time of enormous progress in the woodwind family, mainly situated in France with the Hotteterre family at the centre. Since the musette was a very popular instrument, it makes sense that they experimented a lot with it. And finally, having an increased range, thus more musical possibilities, would make the musette more interesting for composers. For example, the first note in the musette part for ‘Les Indes Galantes’ by Rameau, is a low d, impossible to play on a standard musette, so this part would have been written with a musette à ravalement in mind. Some other opera’s also feature the musette à ravalement, as well as a few pieces by Claude Deshayes and Delavigne. Since Delavigne was not only a composer, but also a musette builder, we can assume he was one of the few people making the musette à ravalement.
While tuning this instrument I had a great time playing and exploring the possibilities. It combines a solo instrument and something you could use to accompany others. I expect to have a lot of fun using it, both for baroque music as more folky stuff.
Although my initial idea was to just do the restoration and never make anything like this again, I have to admit this musette is growing on me. I caught myself thinking about making a wooden replica with a few adjustments to the keys, or perhaps trying out one of the other models… Either way, I’m pretty sure the story doesn’t end here.
- Data Processing Notice (GDPR)
-
 @BagpipeSociety on X
(formally known as Twitter)
@BagpipeSociety on X
(formally known as Twitter)
-
 TheBagpipeSociety on
Instagram
TheBagpipeSociety on
Instagram
-
 BagpipeSociety on Facebook
Something wrong or missing from this page? Let us know!